Applies To: ThreatSync+ NDR
This feature is only available with a ThreatSync+ NDR or Total NDR license. For more information, go to About ThreatSync+ NDR Licenses and About Total NDR Licenses.
To monitor and detect threats in your Azure workloads, ThreatSync+ NDR requires access to your Azure flow log data. To collect this data and monitor the Azure log traffic, you must add and configure a cloud integration in WatchGuard Cloud.
Configuration of an Azure flow logs integration is a two-step process. You must first complete configuration in the Microsoft Azure Portal, and then create the Azure flow logs integration in the ThreatSync+ Integrations UI.
Before You Begin
Before you can create a cloud integration with Azure flow logs, you must:
- Enable Azure Network Watcher
- Register Microsoft Insights Provider
- Create a Storage Account
- Create a Shared Access Signature (SAS) Token
- Create VNet Flow Logs
Enable Azure Network Watcher
Before ThreatSync+ NDR can connect to data through a cloud integration, you must enable Azure Network Watcher. Azure VNet flow logs is a feature of Network Watcher that captures IP traffic that flows through a virtual network. By default, Network Watcher is automatically enabled for your virtual network region.
Before you enable Azure Network Watcher, make sure that you:
- Have an active Azure account and you can connect to https://portal.azure.com.
- Have a user with either Network Contributor and Storage Account Contributor built-in roles, or a custom role with equivalent permission. This permission is a one-time requirement for the user to complete the configuration and only required again to edit the configuration.
To verify that you have the required role, go to List Azure role assignments using the Azure portal in the Azure documentation. For more information, go to Azure built-in roles.
Create or use an existing Network Watcher service in the region where your Azure workloads are running.
To create a new Network Watcher service:
- Log in to the Azure Portal with your Microsoft Azure account credentials.
- In the Search text box, type Network Watcher.
- Select Network Watcher in the list of services.
The Network Watcher page opens. - Click Create.
- In the Add network watcher pane, select a Subscription and the Region where your Azure workloads are running.

- Click Add.
The new Network Watcher service shows in the list.
For more information, go to Enable or disable Azure Network Watcher in the Microsoft Azure documentation.
Register Microsoft Insights Provider
VNet flow logs requires a Microsoft.Insights provider to be registered to use the Azure Monitor service.
To register the provider, complete these steps:
- In the Search text box, type Subscriptions.
- Select Subscriptions in the list of services and select the subscription you want to enable the provider for.
- From the left pane of the selected subscription, expand the Settings drop-down list. Select Resource providers.

- In the Filter by name text box, type Microsoft.Insights and confirm that the status of the provider shows as Registered.

Create a Storage Account
Flow data from VNet logs is sent to Azure Storage. The Azure storage account must be created in the same region where your Azure workloads are running and where the VNet flow logs are created. When you create VNet flow logs, you must specify the storage account where flow logs will be written.
To create a storage account:
- In the Search text box, type Storage Accounts.
- Select Storage accounts in the search results.
- On the Storage accounts page, click Create to create a new storage account.
- In the Storage account name text box, type a storage account name.
Save this storage account name in a secure location. You must provide the storage account name to create the Azure flow logs integration in the ThreatSync+ Integrations UI.
- Select or verify that the region is the same region where your Azure workloads are running.
- Click Review + create.
- On the Review + create tab, in the Security section, make sure that Secure transfer and Allow storage account key access are enabled. This should be enabled by default.
- In the Networking section, make sure that Network connectivity shows Public endpoint (all networks). This should be enabled by default.

- Click Create.
For more information, go to Create an Azure storage account in the Microsoft Azure documentation.
Create a Shared Access Signature (SAS) Token
After deployment of the new storage account is complete, you must create a Shared Access Signature (SAS) token. After the VNet logs are stored, ThreatSync+ NDR requires the telemetry logs that Azure created to connect to the account with the SAS token.
SAS tokens are used to provide permissions to storage resources and should be protected similar to account keys. The SAS token must have read-only permission. Do not use a SAS token with write permissions.
To create a SAS token:
- In the Search text box, search for the new storage account name and select the storage account from the list.
- From the left pane of the Storage Account Details page, in the Security + networking section, select Shared access signature.
- On the Shared Access Signature page, select these values:
- Allowed services — select Blob.
- Allowed resource types — select Container and Object.
- Allowed permissions — select Read and List.

- Select the start and end date. This is the expiration date for the SAS token. The default duration is 48 hours.
When the SAS token expires, you must edit the Azure flow logs integration in the ThreatSync+ Integrations UI and update the token. For more information, go to Edit an Azure Cloud Integration.
- Click Generate SAS and connection string.
- Copy the SAS token and save it to a secure location.
You must have this SAS token to create the Azure flow logs integration in the ThreatSync+ Integrations UI.
For more information, go to SAS tokens for your storage containers in the Microsoft Azure documentation.
Create VNet Flow Logs
Virtual network flow logs are a feature of Azure Network Watcher. These flow logs contain detailed information about IP traffic that flows through the virtual network.
Only VNet flow logs are supported. Network Security Group (NSG) flow logs will retire on 30 September 2027, and new NSG flow logs cannot be created effective 30 June 2025. For more information, go to Flow logging for network security groups in the Microsoft Azure documentation.
For more information about VNet flow logs, go to Virtual network flow logs in the Microsoft Azure documentation.
To create VNet flow logs:
- In the Search text box, type Network Watcher and select Network Watcher in the search results.
- In the left pane, expand the Logs drop-down list. Select Flow Logs.
- Click Create.
- On the Create a flow log page, next to Flow log type, select Virtual network.
- From the Select target resource drop-down list, select Virtual network.
The Select virtual network page opens. - Review the Location and Resource Group columns to confirm where your Azure workloads are running.
- Click Confirm selection.
- In the Instance details section, from the Storage accounts drop-down list, select the storage account.
- In the Retention (days) text box, enter the flow log retention days. For example, 7.
- Click Review + Create.
Create an Azure Flow Logs Cloud Integration
To create an Azure flow logs cloud integration, you must have the Azure storage account name and shared account token.
To create a cloud integration, from WatchGuard Cloud:
- Select Configure > ThreatSync+ Integrations > Cloud Integration.
The Cloud Integrations page opens. - Click Add Cloud Integration.

- From the Cloud Service drop-down list, select Azure Flow Logs.
- In the Azure Storage Account Name text box, type your Azure storage account name.
- In the Shared Account Token text box, enter the shared account token. This token is used to connect to the Azure service.
- (Optional) In the Description text box, add a description to describe what this cloud integration is used for.
- Click Activate.

- After the status changes to Active, the cloud integration configuration is complete. It might take up to 30 minutes for the status to change to Active.
- To view the Azure Flow Logs Status and Conversation Flow Count charts, click the cloud integration name to go to the Overview tab on the Cloud Integration Details page.

It might take up to 90 minutes for ThreatSync+ NDR to learn your environment and start to show alerts in the Monitor menu.
Edit an Azure Cloud Integration
You can edit an existing, active Azure cloud integration to change the description, mute repeated failure notifications, or update the shared account token when it is about to expire.
To edit an Azure cloud integration:
- Select Configure > ThreatSync+ Integrations > Cloud Integration.
The Cloud Integrations page opens. - Click the name of the cloud integration you want to edit.
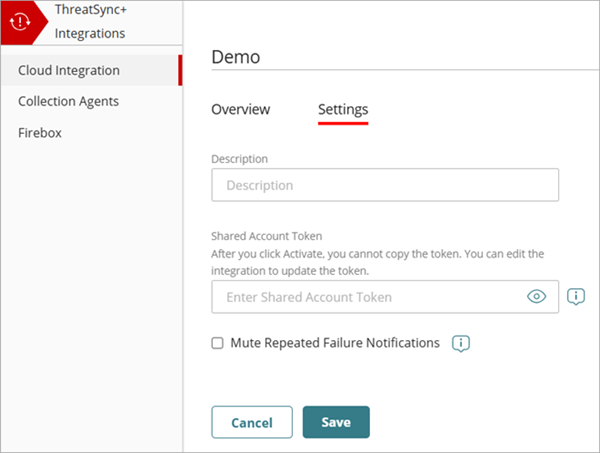
The Cloud Integration Details page opens with the Overview tab open by default. - Select the Settings tab.
- (Optional) In the Description text box, edit the name of the cloud integration.
- (Optional) In the Shared Account Token text box, update the shared account token.
- Select the Mute Repeated Failure Notifications check box if you only want a single notification sent for this cloud integration when a cloud integration failure occurs.
- Click Save.
About ThreatSync+ Cloud Integration — Azure Flow Logs